How to measure solar radiation: A 5-step guide
Have you ever wondered how much sunlight reaches our planet and how this solar radiation impacts our weather, environment, and daily lives? By understanding how much solar radiation we receive and how it varies, we can better understand climate patterns, improve weather forecasts, improve yield of solar energy systems and better protect ourselves from excessive exposure the harmful UV part of solar radiation.
This article provides a comprehensive 5-step process to measure solar radiation. It covers important aspects such as selecting the appropriate solar radiation sensor, choosing an ideal measurement site, properly mounting the sensor and connecting a data logger. Additionally, the article covers quality control and maintenance to ensure the accuracy and reliability of your solar radiation data over time.
What is solar radiation?
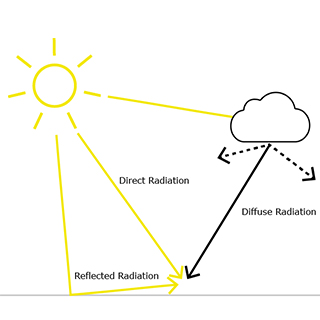
scattered through the atmosphere, or reflected.
Solar radiation refers to the sun's energy, measured in watts per square meter (W/m2). It includes visible sunlight, as well as UV and near-infrared radiation. There are different ways solar radiation reaches the Earth's surface. It can be directly from the sun (Direct Normal Irradiance, DNI), scattered through the atmosphere (Diffuse Horizontal Irradiance, DHI), or reflected (reflected solar radiation).
The sum of the direct and diffuse solar radiation represents the total radiation on the surface, also known as Global Horizontal Irradiance (GHI).
When monitoring PV power plants, both Global Horizontal Irradiance and the irradiance in the plane of the panels, called tilted solar radiation or Plane of Array (POA) irradiance, are required.
The 5-step guide to measure solar radiation
1. Choose a suitable radiation measurement device
When selecting the best solar irradiance meter, you must determine the quantity you want to measure. Below are a few quantities with their recommended measuring devices.
Table 1 Solar radiation measurands with their recommended measuring device.
MEASURAND | INSTRUMENT |
| Direct Normal Irradiance (DNI) | Pyrheliometer on a solar tracker |
| Diffuse Horizontal Irradiance (DHI) | Pyranometer, shaded |
| Reflected solar radiation | Pyranometer, inverted |
| Global Horizontal Irradiance (GHI) | Pyranometer |
| Irradiance in the Plane of Array (POA) | Pyranometer, tilted |
| *Albedo | 2x pyranometer |
| **Surface energy balance | 2x pyranometer + 2x pyrgeometer |
*The albedo is a measure that compares the reflected radiation to the total global radiation. It is an important tool for studying global warming. An albedometer consists of two pyranometers: one facing upwards to the sky and the other facing downwards to the surface. If you want to learn more about albedo and how it can be measured, please read the articles: What is albedo? and How to measure albedo, best practices?
**The surface energy balance is the balance between the incoming and outgoing energy at the earth's surface. It represents the total energy that is available to influence the climate. The surface energy balance can be monitored using a net radiometer consisting of two pyranometers and two pyrgeometers. If you want to learn more about net radiation and how it can be measured, please read the article: How to measure net radiation: a practical guide.
2. Choose the ideal measurement site
Once you know what instrument to use, choosing a site that accurately represents the quantity you want to measure is important.
Pyranometers have a full hemispherical field of view and can capture the entire sky. Therefore, it is important to keep the area in the field of view of the black sensor surface free from obstructions while keeping the instrument accessible for visual inspection and maintenance. Rooftops are generally suitable for mounting radiation measurement devices.
To find an ideal site for measuring solar radiation, it is necessary to identify and chart all obstructions, such as trees, buildings, or poles within the pyranometer’s 360 ° field of view, in particular if these potentially prevent the direct solar radiation reaching the instrument. It is recommended to avoid obstructions that exceed an elevation of 5 ° relative to the sensor.
Several online resources can help you track the sun's path across the sky throughout the year. For instance, Figure 2 shows the sun's trajectory through the sky for six months in Delft, the Netherlands. The vertical axis represents the solar elevation angle, which indicates how high the sun is from the horizon, expressed in degrees. The horizontal axis displays the solar azimuth, the angle between the sun's rays projection and a line due north or south.
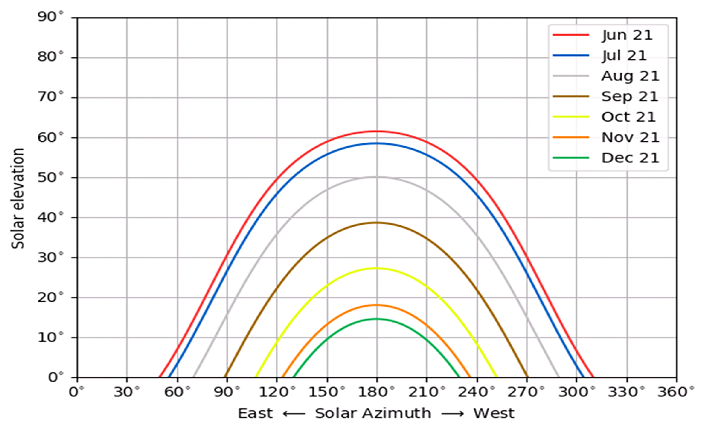
While measuring solar radiation, it is essential to avoid blocking the sun's direct beam. However, sometimes, it is unavoidable. You can determine the periods when it is impossible to prevent obstructing the direct beam by using the plot of the sun's trajectory for your measurement site. These data should be flagged and removed from the dataset.
Finally, it is crucial to avoid placing pyranometers near light-coloured walls or reflective surfaces. Also, it is best not to expose them to artificial radiation sources such as lamps.
3. Install the solar radiation sensor
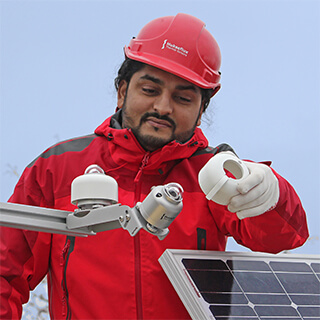
measurement installation, measuring
Global Horizontal Irradiance (GHI)
and Plane of Array (POA).
After selecting the appropriate solar radiation sensor and measurement location, it is time to install the sensor properly. Accurate and reliable results rely on the sensor remaining fixed in its intended position, even in different conditions. Incorrect readings may occur if the sensor is not aligned correctly or is not levelled.
Pyranometers, pyrheliometers, and pyrgeometers that produce output in millivolts work passively and do not require power supplies or batteries.
Pyrheliometers are standardised on 38 mm (1.5 inch) tube diameters, making them easy to mount on a solar tracker. Pyranometers and pyrgeometers have two M5 threads for mounting from below, which can be on a 46 mm or 65 mm pitch. Additionally, all models have a single M6 thread in the centre.
For easier mounting and levelling of instruments on flat surfaces and tubes of varying sizes, Hukseflux provides specialised levelling mounts.
4. Measure and process the data with a data logger
The data can be retrieved after the solar irradiance meter is connected to a measurement device. This measurement can be done with a data logger, but also (if the instrument generates a digital output) by connecting your solar irradiance meter directly to a digital network or computer.
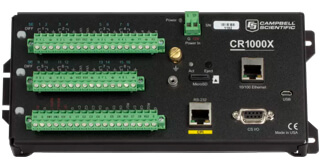
the CR1000X from Campbell Scientific
with analogue input.
Analogue instruments
If your pyranometer, pyrheliometer or pyrgeometer has an analogue output, you must connect it to a data logger capable of measuring small microvolt signals.
Many data loggers are available in the market, so it is important to choose one with good accuracy and resolution in the low voltage range rated for your specific conditions of use. Quality is critical, as using an inaccurate data logger can result in inaccurate measurements, no matter how good your radiation measurement device is.
For calculating the irradiance (E) in W/m², program your data logger to divide the instrument voltage output (U) in V by the sensitivity of the instrument (S) in V/(W/m²).
Digital instruments
Digital pyranometers and pyrheliometers are equipped with onboard analogue to digital conversion, which enables them to be directly connected to a computer or a SCADA (Supervisory Control And Data Acquisition) system. These instruments provide irradiance output directly, eliminating the need to work with the instrument's sensitivity. It is important to note that the calculations for radiant exposures must be done on the computer side, as pyranometers don't have an internal clock.
Modern digital pyranometers and pyrheliometers, like the SR30-D1 and DR30-D1, offer additional measurements such as tilt angle, internal humidity, heater current, and fan speed. These remote diagnostics allow for real-time status monitoring from a distance.
Data collection
It is recommended to store 1-minute irradiance averages, the minimum and maximum irradiance values within that one minute, and the standard deviation. Although measurements every 3 seconds are acceptable for most applications, measuring data every second (a 1 Hz sampling frequency) is considered good practice.
To find radiant exposures H in J/m² or kWh, integrate your 1-minute averages. Depending on your application, you can calculate hourly totals, daily totals, or daily mean irradiance by integrating over different time intervals.
5. Perform quality control and maintenance
Now that you are receiving solar radiation data, it is important to ensure the accuracy and quality of your dataset. The first step is to perform quality control on your data by comparing your measurements with a simple, clear sky model. This will help you identify any unreasonable highs or lows in your data and check whether the times of sunrise, sunset and solar noon match. It is important to do this continuously and not just once.
To maintain a high-quality dataset, taking good care of your instruments is important. This involves frequently cleaning the instrument optics, such as windows and domes, and inspecting instrument level and desiccant. Additionally, a good practice is to recalibrate your instrument every two years.
Tips to save money
Performing a solar radiation measurement can be costly. Here are some tips to save money during the measurement process.
- Look at the system level
When you measure solar radiation, it is usually more than just the radiation that needs to be considered. You can combine electronics and mechanical mounting with other components such as wind, temperature, and humidity. It is best to use one data logger that accepts multiple sensors.
- Use existing electronics
At Hukseflux, we manufacture instruments with many sorts of outputs. So we can interface it with the electronics you already have.
- Be realistic about maintenance
If you cannot clean and recalibrate a high-accuracy sensor regularly, it is recommended to purchase a low-class sensor.
- Save on calibration costs and shipment
Hukseflux can typically offer nearby calibration, so you can send multiple instruments for calibration in one order.
- Save on calibration cost
A higher-class sensor may be used with a longer re-calibration interval.
- Save on cabling costs
Digital sensors can share a cable, and analogue sensors can share a cable through a connection box.
- Save money on infrastructure
A modern alternative to external ventilation is internal ventilation. External ventilation costs much more and requires heavier mounting structures and more power.
- Save money on troubleshooting
Modern instruments like the SR30 pyranometer and the DR30 pyrheliometer allow remote diagnostics, including tilt, internal humidity, ventilator, and heater status.
Conclusion
To begin measuring solar radiation, you should first select a solar irradiance meter that measures the quantity you are interested in. Once you have chosen a device, you should select a measurement site that is representative of your surroundings and install the sunlight measurement device correctly. Once it has been installed, you can begin collecting data and identifying trends. Finally, in order to ensure the accuracy and quality of your dataset, you should perform quality control and maintenance.


